Friday, May 30, 2014
Volvo 940 trailer wiring adapter
I recently picked up a hitch receiver for cheap off craigslist for my 940 with the intention of using it for a bike rack. However I figured I might as well wire up a trailer lighting connector in case I wanted to rent a uhaul. Buying the common 4-pin connector is cheap and hooking it up is pretty simple, except I needed to convert from 5 wire (ground, taillights, brake lights, left turn and right turn) to 4 wire (ground, taillights, combined left turn and brake, combined right turn and brake). European cars usually have separate turn and brake lights, which needs to be adapted to the combined turn and brake lights used on trailers. You can buy adapters that do this but they're kinda expensive ($20+) and draw their current from your car's taillight wiring, which can overload them if your trailer doesn't have led lights. You can add isolation relay to draw power from a separate 12v source but that adds more cost onto the lighting adapter itself.
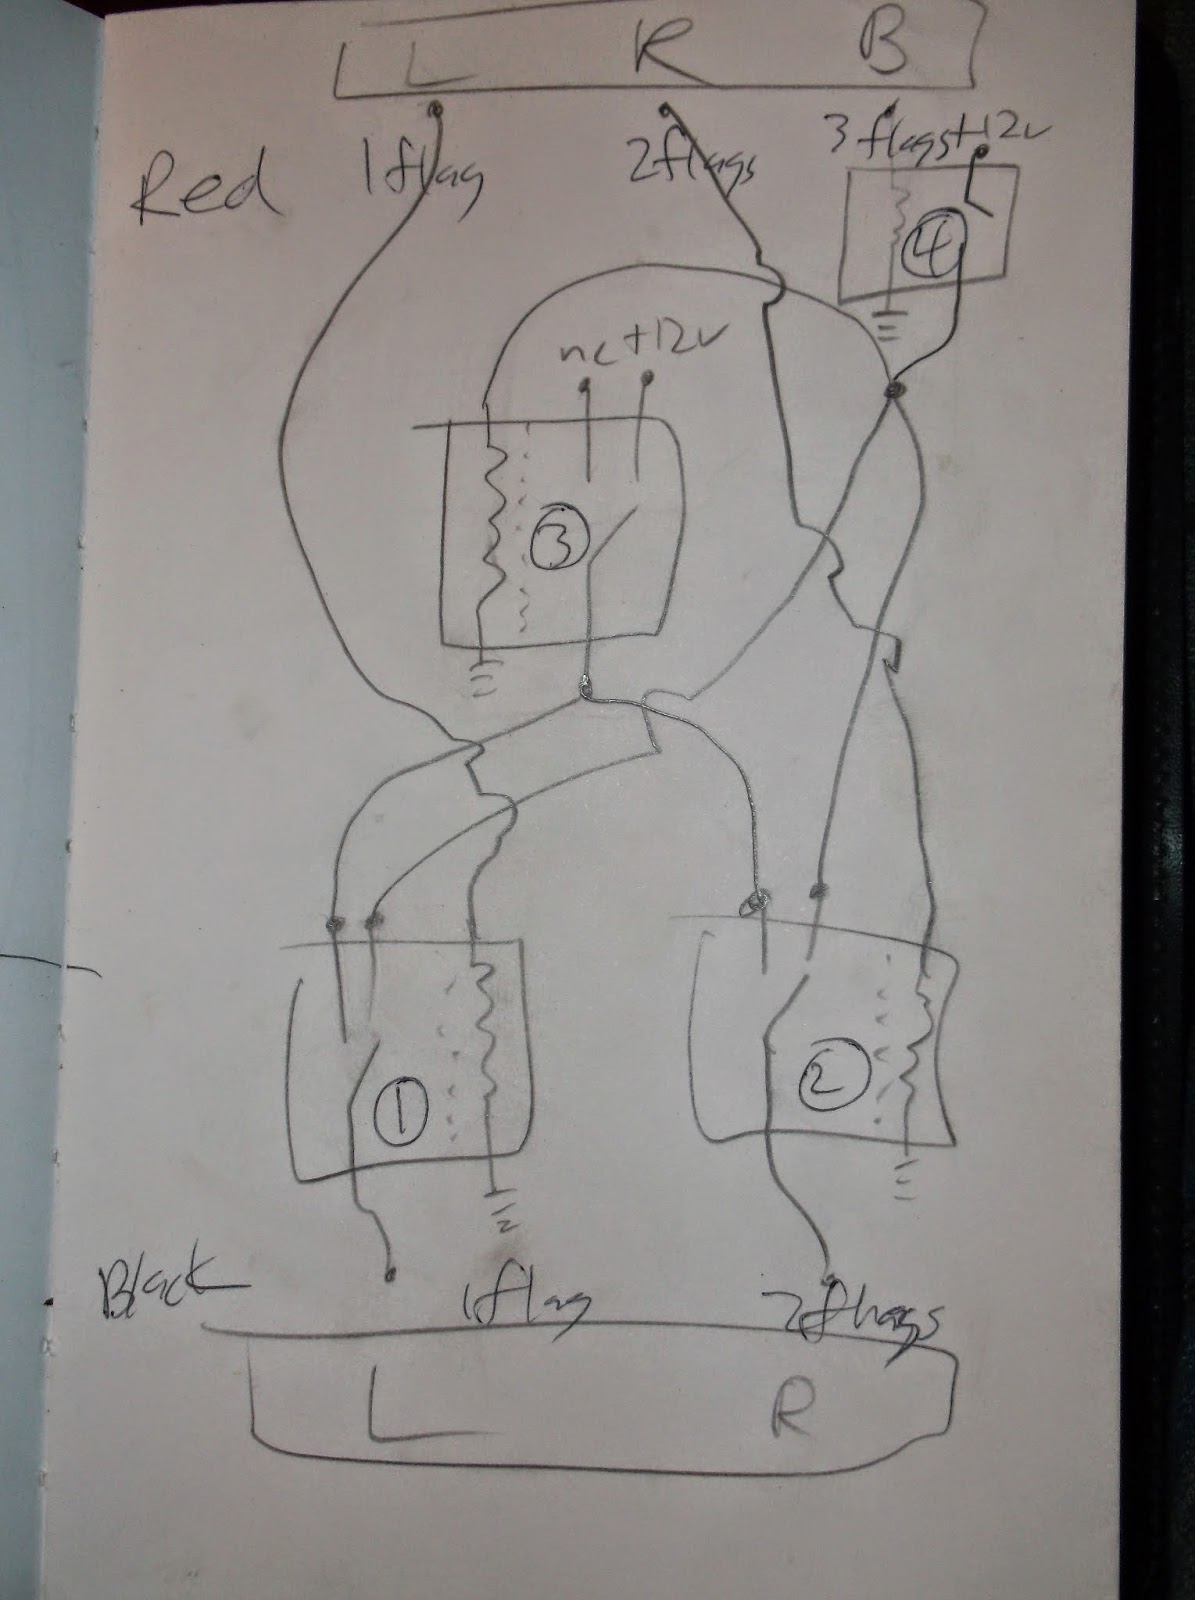
Instead, I built my own trailer adapter using relays that adapts the wiring and provides relay isolation. It requires 5 relays which I purchased from amazon for about $15 including sockets. These are cheap chinese relays, but quality relays cost $15+ each and are unnecessary considering how infrequently I will be using these, if ever. Above is the wiring diagram, which doesn't show the taillight relay. The taillight relay is wired up very simply, with the taillight bulb wire going into the coil and the NO output going to the trailer connector. The rest of the wiring follows the diagram, +12v goes to a fused 12v line running directly to the battery. I fused it at 10 amps which may be higher than necessary but I used wiring that can handle more than 10 amps. Ground should either go to a bolt going into the sheet metal or the grounding bus the lights attach to. As far as tapping into the lights themselves, I used test light (multimeter would work too) to find out which wires were which lights and tapped in at the rear light cluster. If you just hook in directly it will set off the bulb failure relay, but you can compensate for this by adding a resistor equal to the coil of the relay to the bulb on the opposite side of the car. Because the relays are in sockets I remove them all when I'm not towing because I want to extend the life of the relays (chinese relays don't last long under constant use) and because I didn't bother to add the resistors to turn off the bulb failure light.
Volvo 940 roof rack
Having a roof rack was something I'd wanted for moving bulky things like plywood and our homemade boat. I first bought a pair of crossbars that clipped onto the rain gutters which worked well, but couldn't really be left on all the time because they added road noise and reduced mileage. Additionally, I replaced the leaking 20 year old donut with a full size spare tire, and it took up too much space so I needed somewhere else to put it. I decided to build my own that would be lower profile to help with aerodynamics, have a spot for the spare tire, and be more of an actual rack rather than just two crossbars. It also would give a place to mount lights and antennas.
The construction was pretty simple, It's just welded steel. The main crossbars are I think 1 1/4" or 1 1/2" square tubing, and the tubing going around the edges is 3/4". Below is a closeup of the clamping mechanism, it's very similar to regular gutter mount racks. To prevent it from rubbing off the paint I put a small strip of rubber where the clamps attach. A piece of bicycle inner tube would work well. For security, the bolts are "security torx" head which is regular torx with a pin in the middle and a domed head. It just will keep someone from casually removing it with a wrench or pliers. The spare tire mounts using two 1/2" bolts that thread into nuts welded to the crossbar, and lock using a copy of a commercial spare tire lock. A tricky part of this mechanism is that you need the two bolts to be tight but also line up with each other. To do this I added a rubber donut (actually a rubber grommet) between each bolt and the tire. A spring would also work. The cover (which I really don't like the look of) is to prolong the lifespan of the tire by reducing UV exposure. The entire thing fits right on top of the roof (It has about 1/16" gap), so there's no added road noise even with the tire on. So far there's been no noticeable effect on mileage. There are also two plates with holes in the rear corners for NMO antenna mounts. To paint it I started by cleaning it with kerosene, primed it, and painted it with matte black enamel. I then covered the top with truck bed coating to provide a non-slip surface and reduce road noise and whistling by giving it an uneven surface.


The construction was pretty simple, It's just welded steel. The main crossbars are I think 1 1/4" or 1 1/2" square tubing, and the tubing going around the edges is 3/4". Below is a closeup of the clamping mechanism, it's very similar to regular gutter mount racks. To prevent it from rubbing off the paint I put a small strip of rubber where the clamps attach. A piece of bicycle inner tube would work well. For security, the bolts are "security torx" head which is regular torx with a pin in the middle and a domed head. It just will keep someone from casually removing it with a wrench or pliers. The spare tire mounts using two 1/2" bolts that thread into nuts welded to the crossbar, and lock using a copy of a commercial spare tire lock. A tricky part of this mechanism is that you need the two bolts to be tight but also line up with each other. To do this I added a rubber donut (actually a rubber grommet) between each bolt and the tire. A spring would also work. The cover (which I really don't like the look of) is to prolong the lifespan of the tire by reducing UV exposure. The entire thing fits right on top of the roof (It has about 1/16" gap), so there's no added road noise even with the tire on. So far there's been no noticeable effect on mileage. There are also two plates with holes in the rear corners for NMO antenna mounts. To paint it I started by cleaning it with kerosene, primed it, and painted it with matte black enamel. I then covered the top with truck bed coating to provide a non-slip surface and reduce road noise and whistling by giving it an uneven surface.


Volvo 940 replacement hatch lock
Like many used volvos, when I bought mine it came with only one key which was the valet key. The valet key only opens the door and starts the car, it won't lock or unlock the glove box, trunk, or storage hatch in wagon models. One option would be to order a replacement "normal" key from a dealer, but my local volvo dealer won't have anything to do with keys. Instead I replaced it with my own locking mechanism for cheap. I did this on my 940 wagon, but it most likely applies to 740s and maybe 240s as well. Construction was very simple. First, I removed the original locking mechanism leaving just a hole in the wood. Next I removed the metal piece the lock engages with which is held in with two torx (t25) screws. Then I took a piece of steel flat stock about an inch or and inch and a half wide and 1/8" thick (thicker would work) and drilled two holes to match the piece I removed. Finally, I drilled a 3/8" or so hole at the other end for the padlock and used a mini-sledge and vise to add a slight bend to it so it would fit through the hole. I used the original torx screws with a little threadlocker to attach it. You can use any kind of lock, but I used a hockey puck lock I got off ebay for maximum security.


Checking your harmonic balancer
One of
the common problems with aging redblock volvos is the harmonic balancer
slipping. The harmonic balancer is the pulley coming off the crankshaft
on the front of the engine that drives the accessories via belts. It's
not a solid pulley, it consists of an inner and outer steel piece with a
rubber spacer between them to reduce vibrations. Over time the rubber
degrades and the outer pulley slips or wobbles. This can cause noise
and vibrations, make the belts slip, and eventually fall apart.
The reason I'm posting this is that this is very easy to diagnose and since all redblocks are pushing at least 20 years old it's something you should be aware of if you own one. All you have to do is use some chalk, paint pen, marking crayon, etc and mark the inner and outer parts of the pulley. Below are pictures of how I did it. It doesn't have to be very exact, if it's worn it will slip a lot. Once it's marked anytime you have the hood open take a look and see if they're still lined up.
The reason I'm posting this is that this is very easy to diagnose and since all redblocks are pushing at least 20 years old it's something you should be aware of if you own one. All you have to do is use some chalk, paint pen, marking crayon, etc and mark the inner and outer parts of the pulley. Below are pictures of how I did it. It doesn't have to be very exact, if it's worn it will slip a lot. Once it's marked anytime you have the hood open take a look and see if they're still lined up.


Subscribe to:
Posts (Atom)